If you are looking for an effective way to generate quality leads and grow your customer base, the Affiracle system offers a perfect solution through affiliate programs. This guide will explain how to set up a campaign based on Pay Per Lead (CPL).
Note: If you haven't created a store in the system yet, you can use the guide at the following link: Store Creation Guide.
What is the difference between a standard CPA campaign and a CPL campaign?
A standard CPA campaign rewards partners based on a purchase made through their link. In contrast, a CPL campaign rewards partners for leads - potential customers who filled out a lead form, regardless of an actual purchase.
Step One: Registration and Integration
- After registering with the system and adding your store or website, you must perform a "manual installation" integration.
- Add the following script before the closing
</head>tag on all pages of your website:Note: The code above is an example only. You must use your specific ID as it appears in the system.<script src="https://miracle.affiracle.com/exampleID.js"></script>
Step Two: Creating a New Campaign
- In the Affiracle system, go to "Add Campaigns" to define a new campaign.
- Select the store you wish to promote.
- Add a campaign name and a detailed description explaining the store and your goals to the partners.
- Choose an image to represent the campaign. If you have already uploaded a logo for the store, an additional image is not required.
- Select the "Active" status if you wish to launch the campaign immediately.
Step Three: Defining CPL
- Select the "Pay Per Lead" option.
- Define the following details:
- Commission per Lead: Specify the reward for partners for each lead.
- Lead Name: A clear name to help partners understand the purpose of the lead.
- Lead Identifier: A unique identifier that you will broadcast on the thank-you page.
- Landing Page: The URL of the page where the lead form is located. If the form appears on the homepage, this can be left blank.
- Click the "Add" button to save the setting. You can add multiple types of leads as needed.
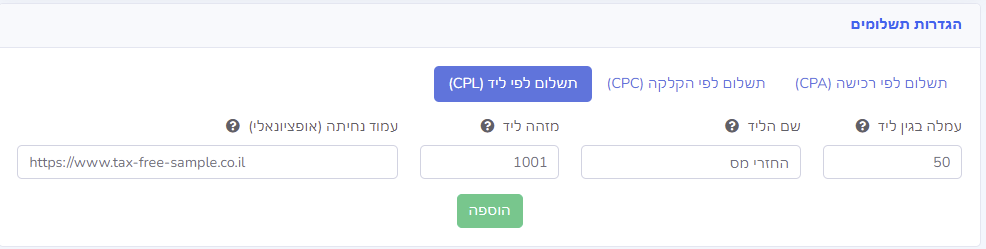 Lead commission settings
- On the thank-you page, add the following code (make sure to update the ID and lead_id to your specific examples):
<script>(function() {var tracking_id = 'exampleTrackingID';var leadId = 'exampleLeadID';affiracleTrackConversion({tracking_id: tracking_id,lead_id: leadId});})();</script>

Step Four: Lead Management and Rejection Reasons
By clicking on "Rejection Reasons," define reasons such as:
- "Incorrect details."
- "Customer denies request."
- "Duplicate lead."
Lead Description:
Add a detailed description that clarifies to partners what constitutes a high-quality lead and what your goals are.
Step Five: Additional Campaign Settings
Scheduling Settings:
- You can activate the campaign immediately or set specific start and end dates.
Partner Settings:
- Choose whether partners can join automatically or require manual approval.
Terms and Prohibitions:
- Define clear usage rules for partners, for example, prohibiting promotion through certain platforms.
Lead Management and Operation
- New leads will arrive in your lead interface. There, you can:
- View lead details, the partner, and the reward.
- Approve or reject the lead.
- Specify a rejection reason from the list you defined.
- Add a lead description to explain your requirements for high-quality leads to partners.
- Click on "Rejection Reasons" to define reasons such as "Incorrect details," "Duplicate lead," etc.
Summary
Once you have finished defining the campaign and filling in all the details, click "Add Campaign." You are now ready! Partners can join and start generating quality leads for you.